Proxmox
Prerequisite: Hardware
Once you have your hardware on hand and ready to go, the first thing to do is install Proxmox on it.
Proxmox Virtual Environment (aka Proxmox VE, PVE, or simply Proxmox) is the “bare-metal” OS that you will install directly on your hardware.
It is a free and open-source virtualization platform designed to “sit in-between” your hardware and one or more virtual machines (VMs), and allows for easy management of the VMs running on your server through a web UI that is accessible from any other computer on your home network.
“Why don’t I just install Linux directly and use that instead?”
You can if you want, and that’s totally fine. But using Proxmox as a “base layer” for your server provides much more flexibility for maintenance, experimentation and learning.
This will be the first step in the software part of this journey, so once you have your hardware ready, proceed with the steps below.
Prepare Installation Media
On a personal computer, connect a USB flash drive with at least 4GB of capacity. We will write the installer to this USB drive and then use it to boot the Proxmox installer on your server.
NOTE: Any data currently stored on this USB drive will be destroyed during this process. Always ensure you have any important data backed up somewhere safe.
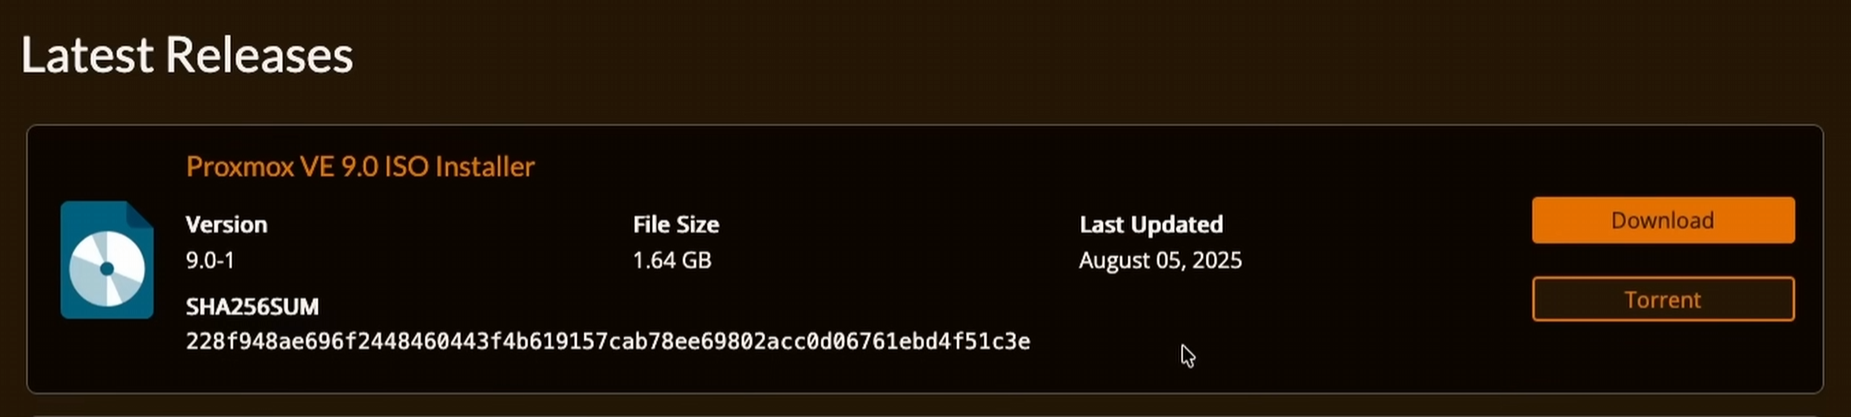
Download Proxmox VE ISO Installer
Navigate here and download the latest version of the Proxmox VE ISO installer:
Flash Your Installer
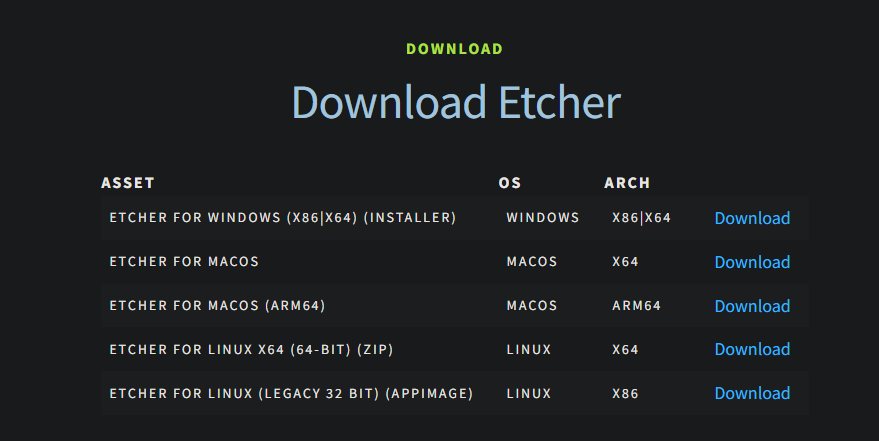
Navigate here and download Balena Etcher. This is a tool that runs on Windows, macOS and Linux that you will use to write the Proxmox VE ISO installer file to your USB flash drive.
-
Run Balena Etcher and choose “Flash from file”, then select the Proxmox VE ISO installer file you downloaded.
-
Click “Select target”, check the box for the USB flash drive you have connected (it will usually do this for you automatically), then click “Select 1”.
NOTE: Triple-check you have the correct disk selected, and ONLY that disk. You can unintentionally destroy important data by mistaking one disk for another, or by accidentally selecting multiple disks.
- Click “Flash!”
Once the process is complete, close Balena Etcher, unmount/eject your USB drive, then disconnect it from your computer.
Install Proxmox
Before You Begin
Connect the following to your server:
-
An ethernet cable connected to your home network (router, etc.)
-
A monitor
-
A keyboard
-
A mouse
-
The USB flash drive you flashed earlier
BIOS Settings
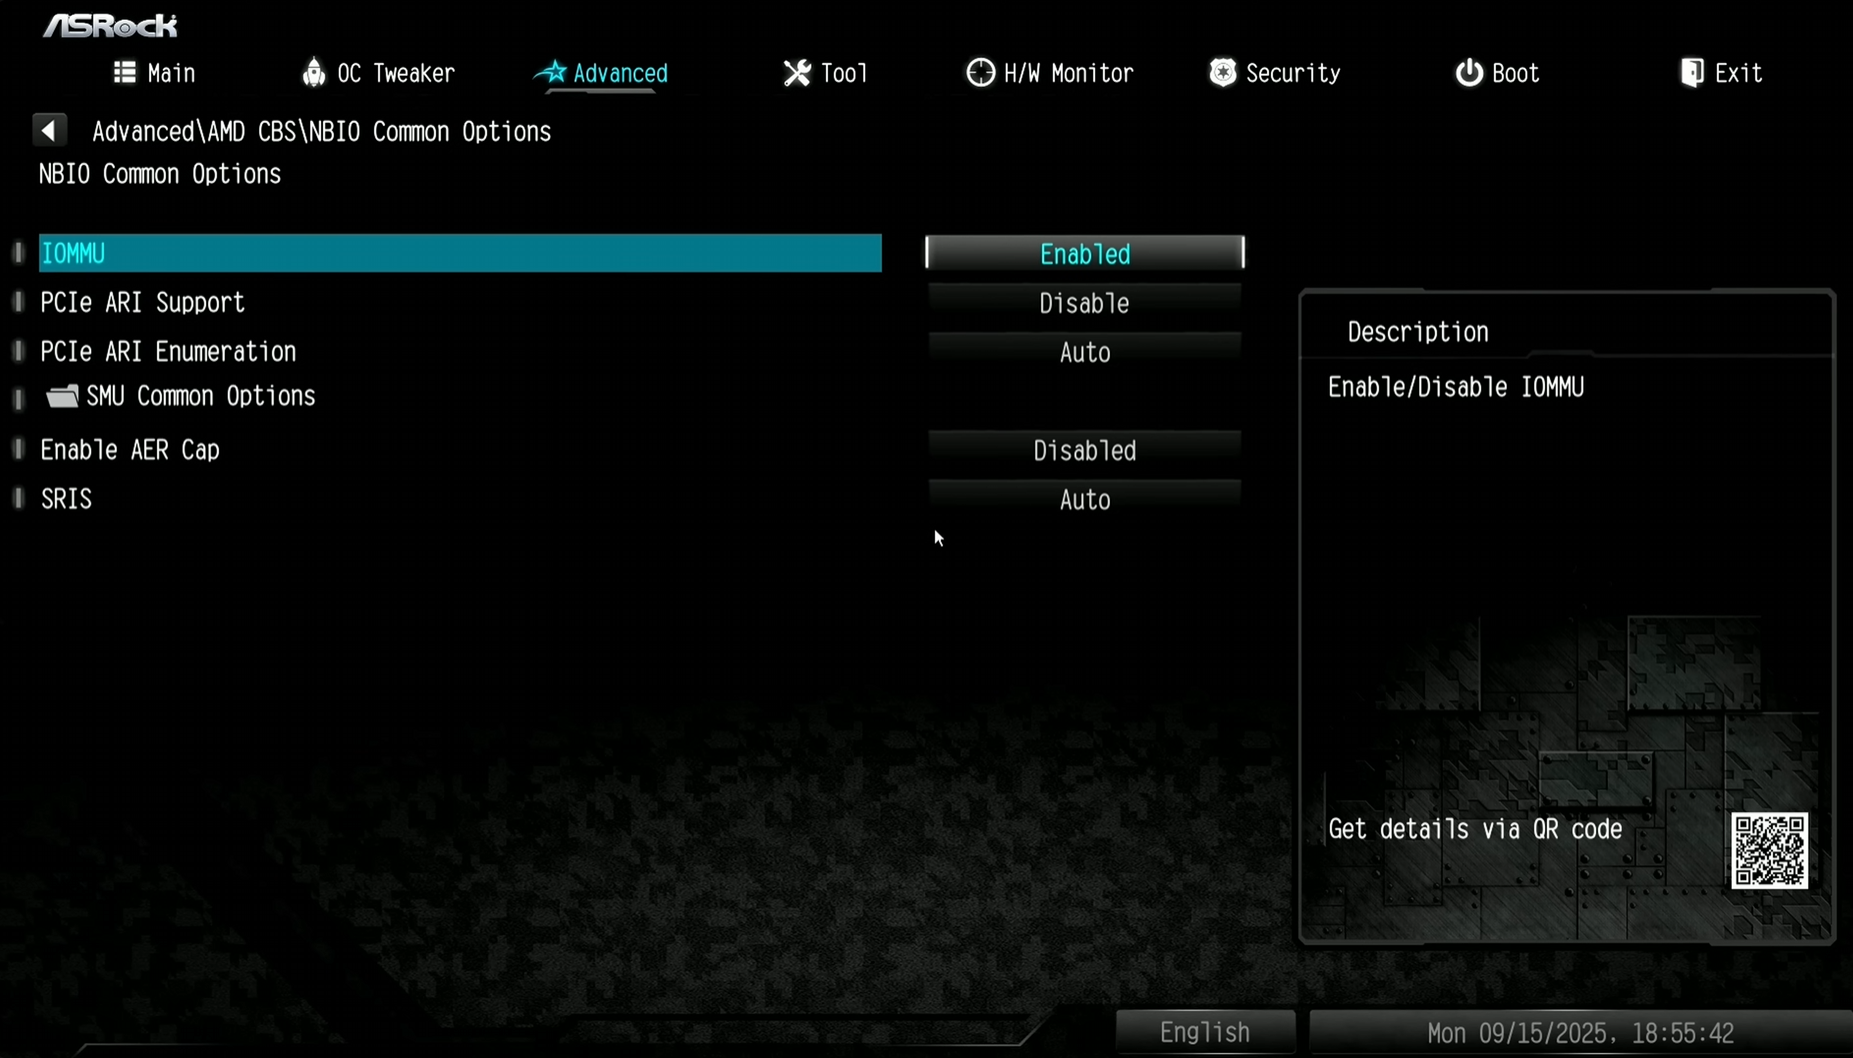
Power on your server and first go into your BIOS (usually this is achieved by repeatedly pressing the F1, F2 or Delete key when turning on the computer - this varies by manufacturer).
Once you land in the BIOS, look through the menus and ensure either VT-d (Intel) or SVM (AMD) is enabled, then ensure IOMMU is enabled if possible, and finally, disable Secure Boot.
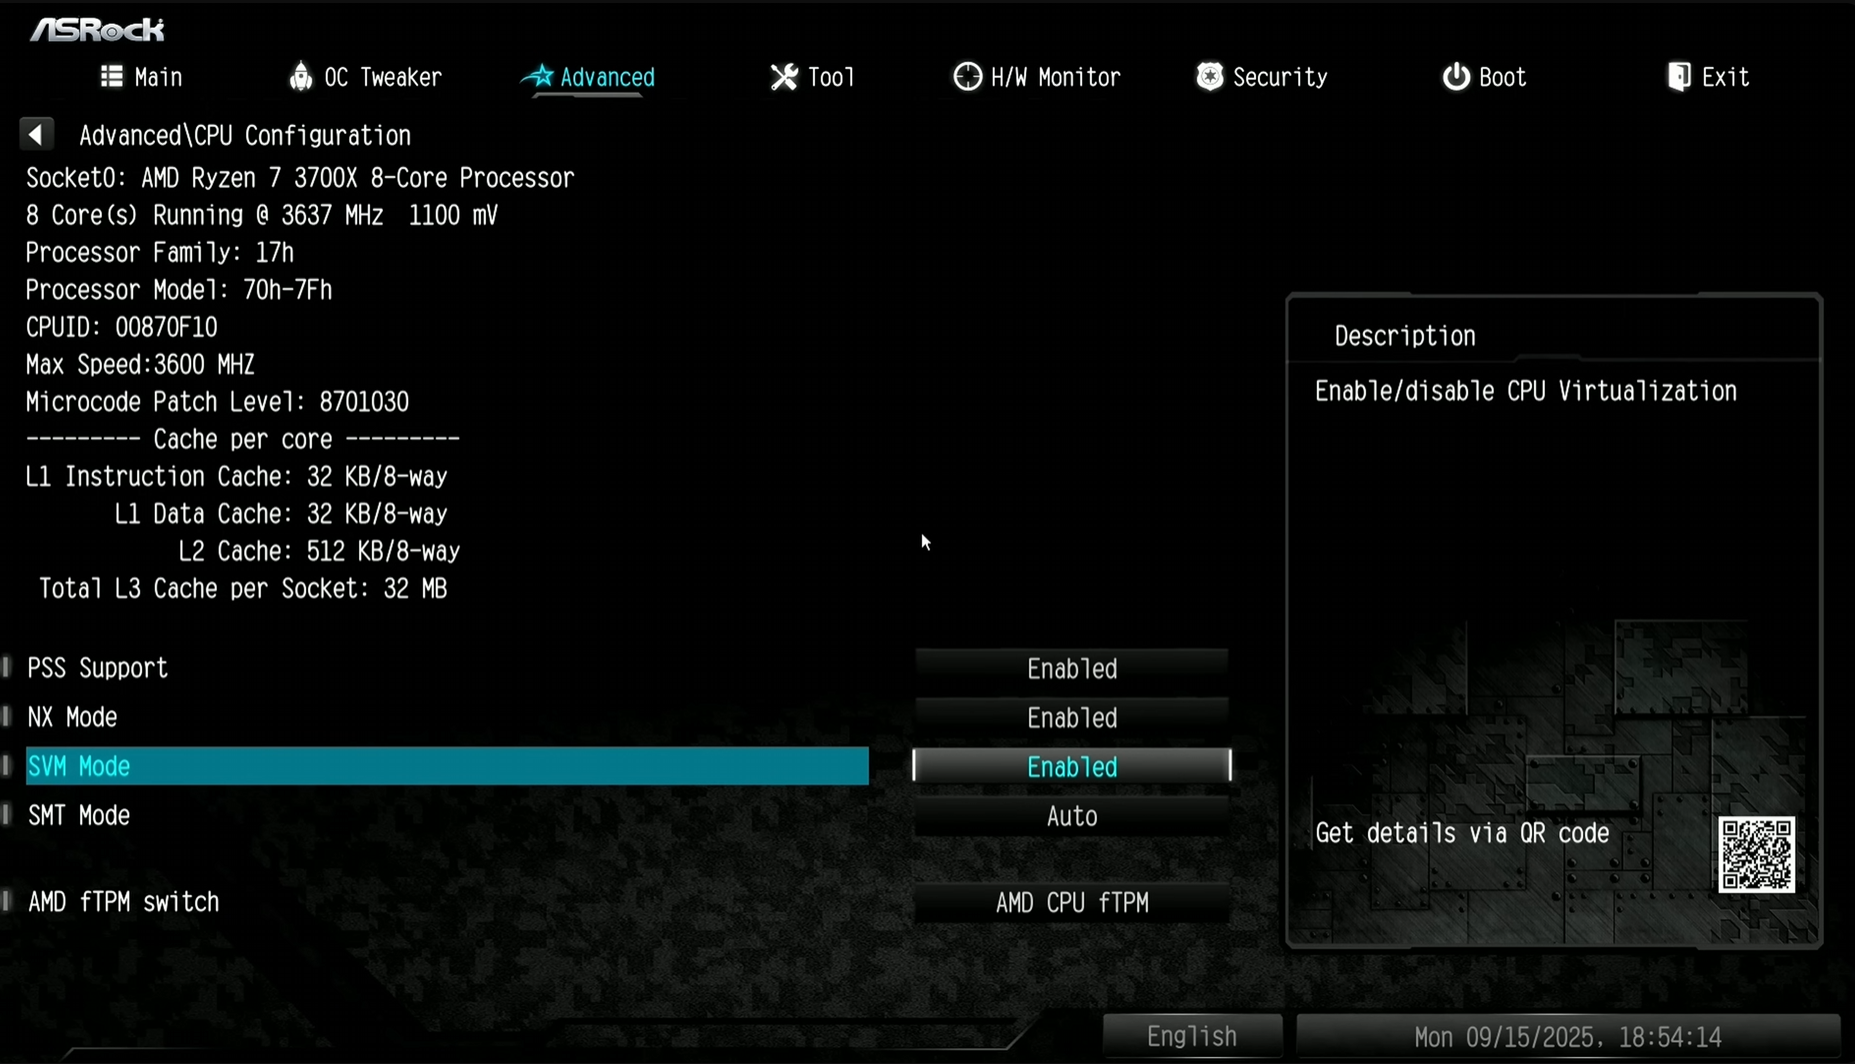
Without VT-d or SVM enabled, virtualization will not work at all.
Enabling IOMMU ensures we can more easily pass through hardware devices like a GPU to a specific VM.
Leaving Secure Boot enabled can prevent some Linux distributions from booting properly.
Save your changes to the BIOS and reboot the server.
Boot the Installer
Override the boot media by accessing the boot menu after rebooting the server (usually this is achieved by repeatedly pressing the F11 key when turning on the computer, but again this varies by manufacturer), then choose to boot from the USB drive you flashed earlier.
After booting from the USB drive, choose “Install Proxmox VE (Graphical)” to proceed.

On the next page, accept the EULA to proceed.
Choose Target Disk(s)
Choose the target disk to install Proxmox on. You do not want to select a HDD for this. Install Proxmox to an SSD, ideally a fast NVMe drive.
After selecting your SSD, click “Options” and choose ext4 for your filesystem type, then click “OK” to confirm before proceeding.
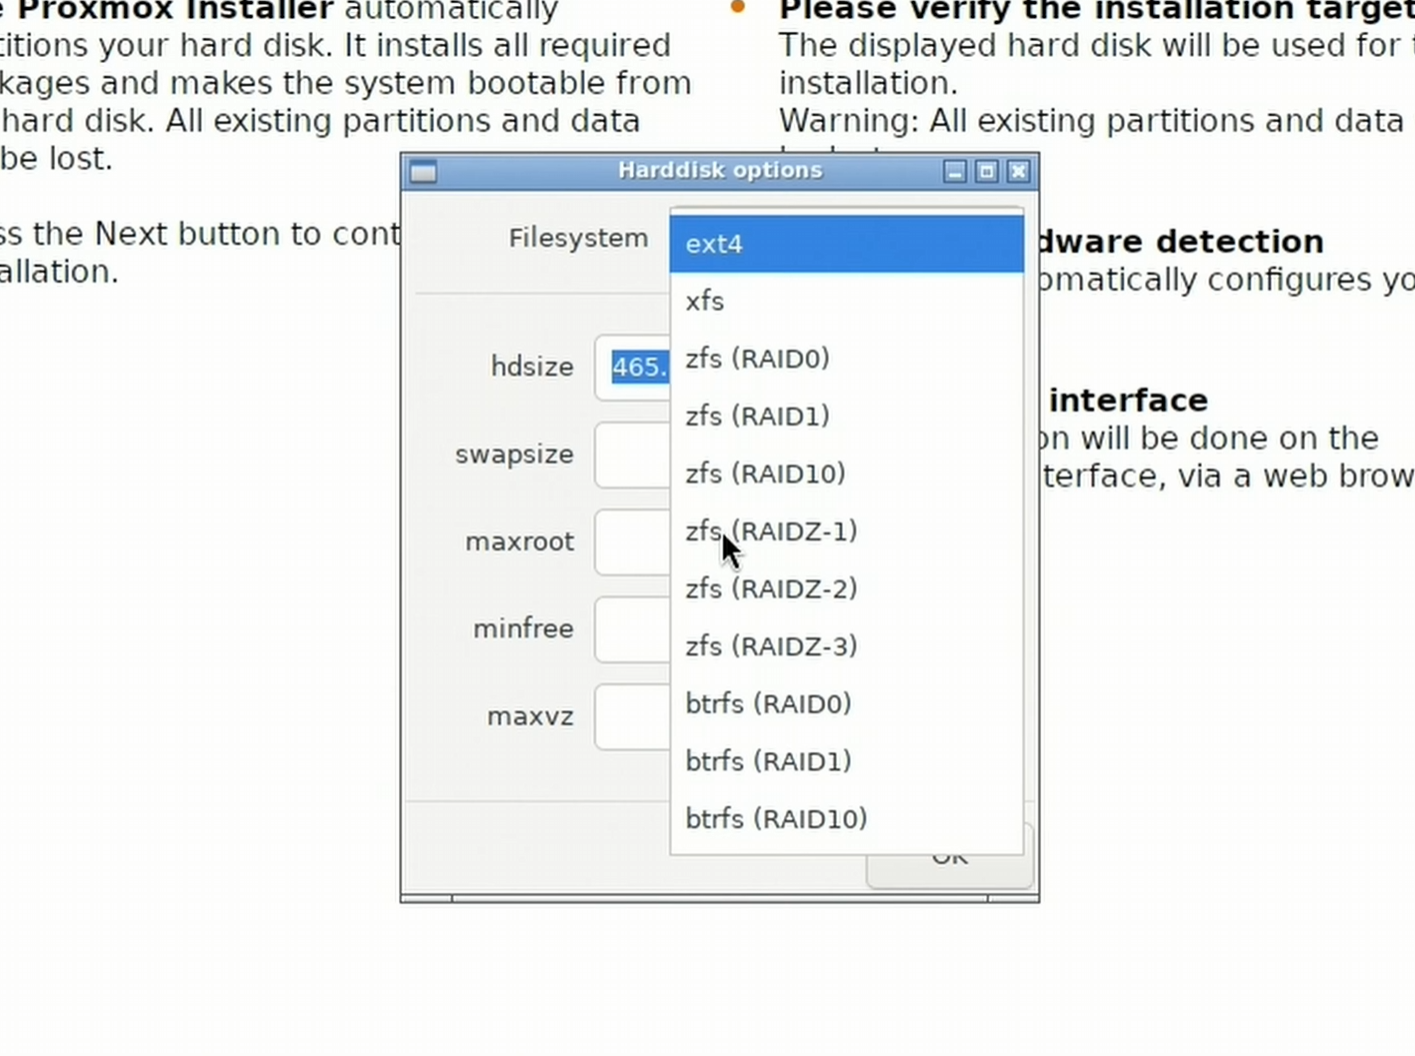
Optional: If you instead want to use two or more NVMe drives instead of just one (for redundancy in case one of them fails):
- After clicking “Options”, change the filesystem to “ZFS (RAID1)”.
- Change “Harddisk 0” to the first NVMe drive.
- Change “Harddisk 1” to the second NVMe drive (repeat as necessary).
- Ensure all other “Harddisk X” choices are set to
-- do not use --- Click “OK” to confirm before proceeding.
Locale and Keyboard Layout
Select your country, time zone and keyboard layout, then click “Next” to proceed.
Authentication
Create an administrator password (don’t forget it!) and enter your email address, then click “Next” to proceed.
Network Configuration
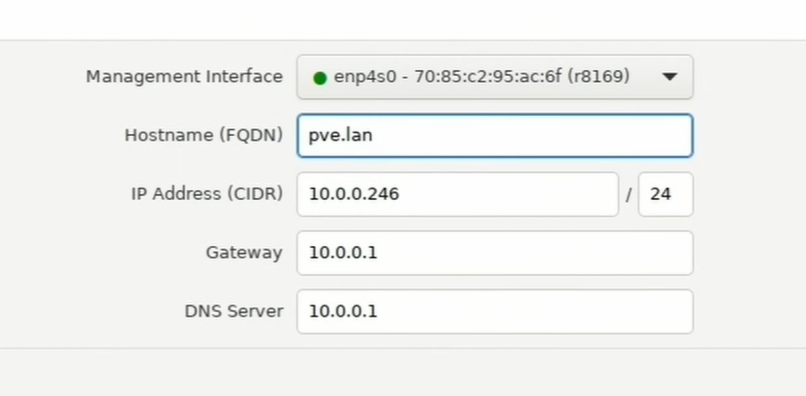
If your server was able to automatically make a successful connection to your home network via the attached ethernet cable, “Management Interface” should already be chosen for you with a green dot next to the selected interface, leave this alone.
“Hostname” will default to something like “pve.home.lan” or “pve.lan”, etc. If you want to customize the name of your server, only change the “pve” part of the hostname to something else, or instead just leave it as “pve”.
“IP Address” should already be autopopulated with whatever local IP address your router/DHCP assigned to your server. Because Proxmox uses a static IP address (meaning it will never change), I recommend changing the last octet to something you’ll remember easily.
- For example: instead of
10.0.0.246, use something like10.0.0.20or10.0.0.100, etc.
Ensure the IP address you are changing this to is not already in use by another device on your network.
You can do this from another computer on your local network by opening a terminal and typingping 10.0.0.20and then hit Enter. If you don’t see any responses to your pings, that IP address is likely available for use.
Click “Next” to proceed.
Pre-Installation Summary
Review the details on the summary page, then when ready, click “Install” to proceed.
Post-Installation
After the installation is complete, you will see a message on the screen stating the server is about to reboot and that you need to remove the boot media. Go ahead and remove the USB drive at this point so that you don’t accidentally boot back into the Proxmox installer once the reboot is complete.
Once the server has completed rebooting, it should boot automatically into the new Proxmox installation you just created on the server’s SSD. On the monitor, you will only just see white text on a black screen telling you to use a web browser access the server by connecting to the server’s IP address on port 8006 (example: https://10.0.0.20:8006)
Congrats! Proxmox is now up and running. You can now disconnect everything from the server except for the power cable and the ethernet cable, since from this point forward you will manage your server over the network from your personal computer.
Proxmox Configuration
Now that Proxmox is installed on your server, we need to do some configuration to ensure everything is set up appropriately for our purposes.
Accessing Proxmox’s Web UI
-
On your personal computer, open a web browser and navigate to port 8006 on your server’s IP address (example:
https://10.0.0.20:8006) -
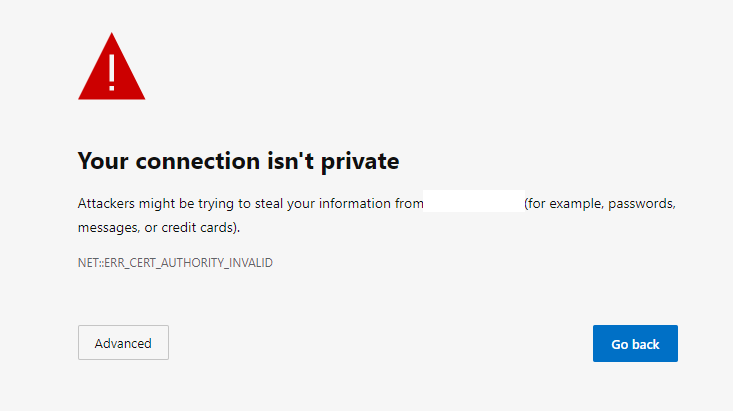
You will likely get a warning from your browser stating that the website is not secure. This is because the Proxmox’s web interface is served over HTTPS, but only has a self-signed certificate for this connection. This is expected, it is nothing to worry about and can be ignored. Simply proceed by clicking “Advanced” and then click “Proceed to website” (this process varies depending on which browser you are using).
-
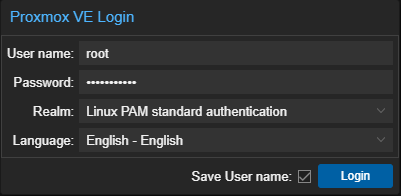
Log into the web interface by entering the username “root”, along with the password you set during the installation process.
-
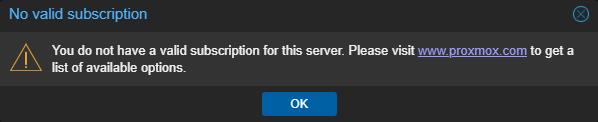
The first thing you will see is a nag message stating that you do not have a valid subscription for your server. This is expected since we are using Proxmox for personal use and don’t have an enterprise subscription. Simply ignore this message and click OK for now, we will disable this nag message in just a moment.
-
You are now logged into the Proxmox web UI for your server.
PVE Post-Install Script
The first thing we will do in the web UI is run the PVE Post-Install script. This script will set up our package repositories correctly so that we can successfully update Proxmox (it’s a good idea to update Proxmox periodically, every week or two is usually often enough). It will also disable the “no valid subscription” nag message.
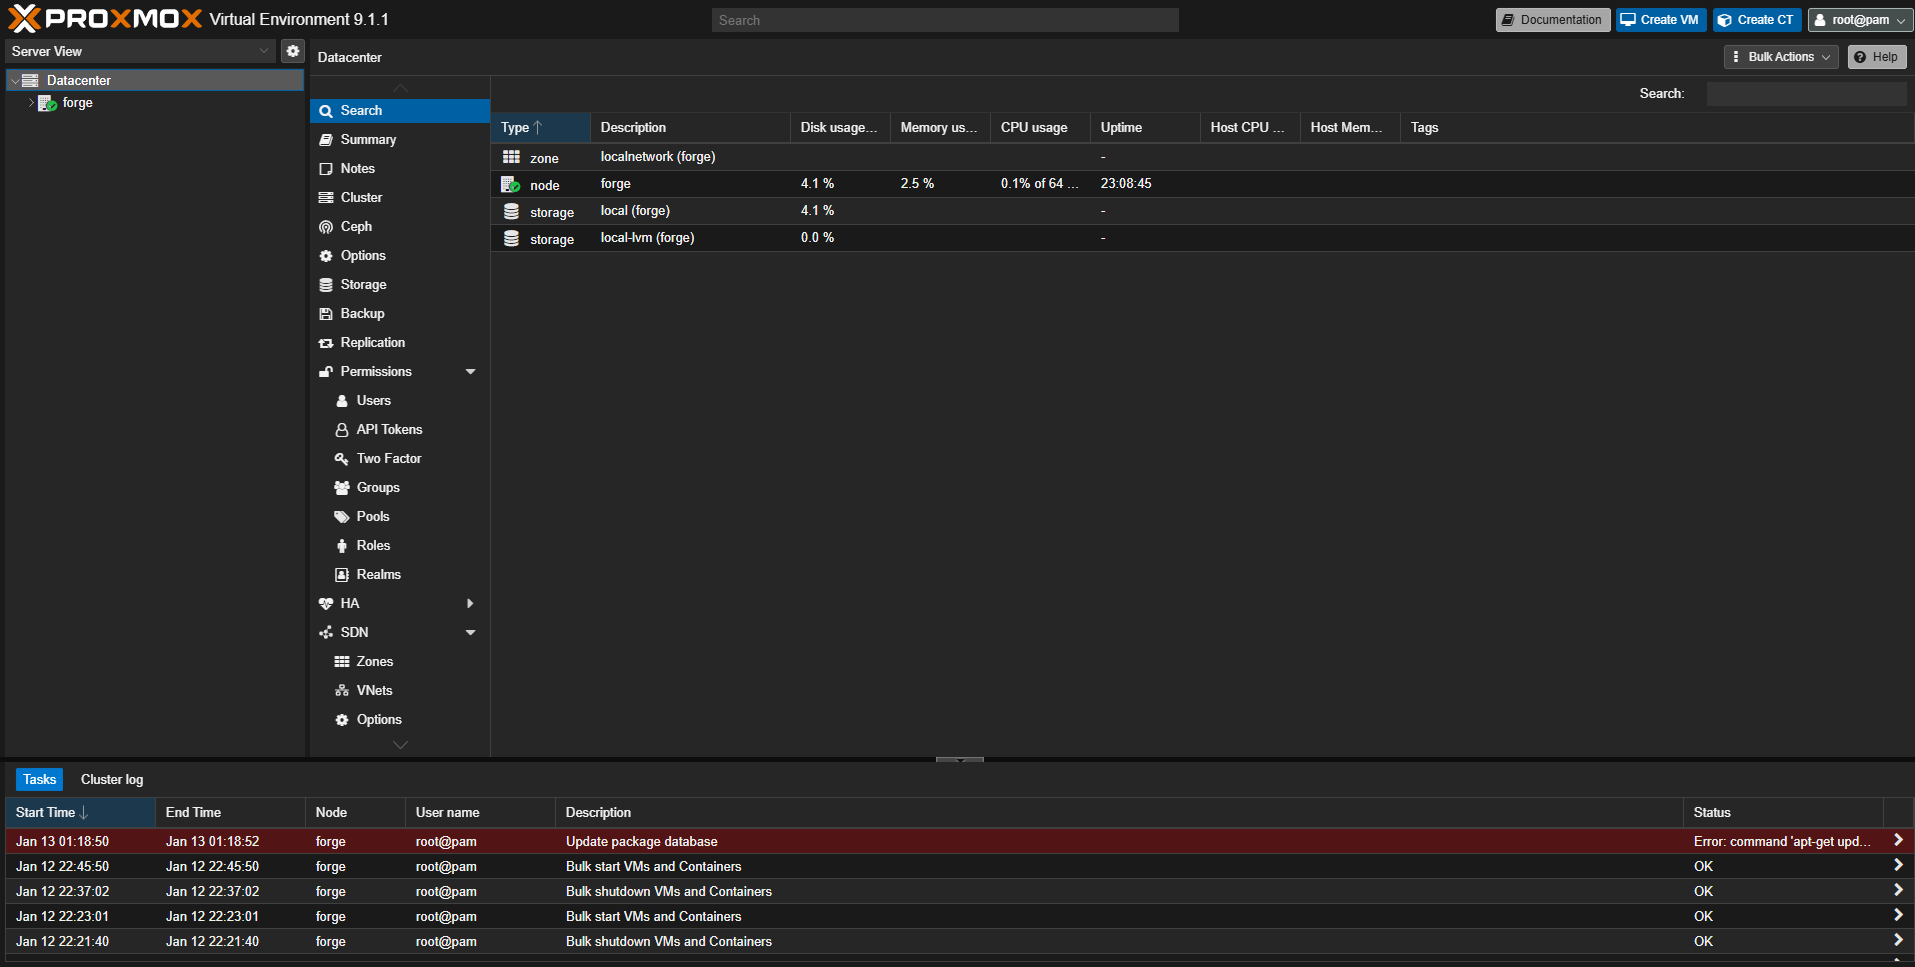
In the sidebar on the far left, you will see that the top level of the hierarchy is named “Datacenter”.
The datacenter can contain multiple Proxmox servers grouped together: this makes a “cluster”, where each server is a “node” in the cluster, but this is outside of the scope of this guide since we will only have a single Proxmox server.
Under “Datacenter”, you should see a single node listed with the hostname you chose during the installation process (in the example below, it is displayed as forge). Click on this, and then on the menu to the right, click on “Shell”.
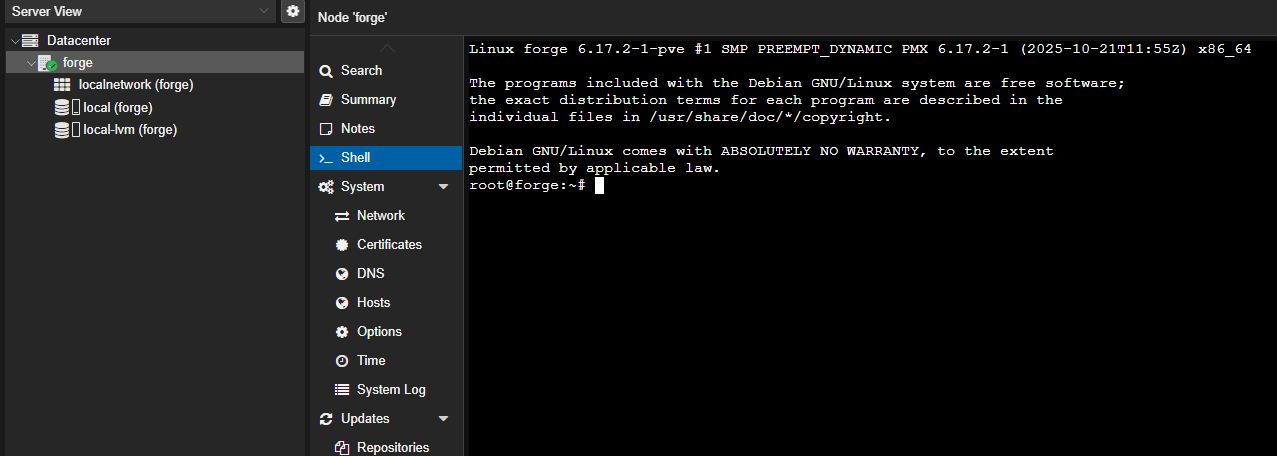
Copy the command below to your clipboard, then press Ctrl + Shift + V (or ⌘ + Shift + V on macOS) to paste it into the shell window, then press the Enter key to run the script.
bash -c "$(curl -fsSL https://raw.githubusercontent.com/community-scripts/ProxmoxVE/main/tools/pve/post-pve-install.sh)"
Follow these steps to complete the PVE Post-Install script:
- When you see the confirmation message, press the
Ykey and then theEnterkey to proceed. - On the next page that shows a message about “Modern deb822 sources”, just hit
Enterto proceed. - On the next page that asks about the
pve-enterpriserepository, use the arrow keys to select Disable and then hitEnterto proceed. - On the next page that asks about the
ceph enterpriserepository, use the arrow keys to select Disable and then hitEnterto proceed. - On the next page that asks about the
pve-no-subscriptionrepository, use the arrow keys to select Yes and then hitEnterto proceed. - On the next page that asks about the
pve-testrepository, use the arrow keys to select No and then hitEnterto proceed. - On the next page that asks about disabling the nag message, use the arrow keys to select Yes and then hit
Enterto proceed. - On the next page that shows a message about supporting the development team, just hit
Enterto proceed. - On the next page that asks about disabling high availability, use the arrow keys to select Yes and then hit
Enterto proceed. - On the next page that asks about disabling Corosync, use the arrow keys to select Yes and then hit
Enterto proceed. - On the next page that asks about updating Proxmox, use the arrow keys to select Yes and then hit
Enterto proceed. - On the next page that shows a message about rebooting after completion, just hit
Enterto proceed. - On the next page that asks you to reboot Proxmox now, use the arrow keys to select Yes and then hit
Enterto proceed.
Enable IOMMU & VFIO
Once the server has rebooted, refresh the webpage to ensure you are connected again. The next thing we will do is enable IOMMU and VFIO to allow us to pass through PCIe devices to our virtual machines.
-
Select your server under “Datacenter” in the far left sidebar.
-
Click on “Shell” in the menu.
-
Enter the command
nano /etc/default/grubinto the shell window to open the configuration file for the grub bootloader in the nano text editor. -
In this file, find the line that shows
GRUB_CMDLINE_LINUX_DEFAULT="quiet" -
If you have an Intel CPU, change this line to:
GRUB_CMDLINE_LINUX_DEFAULT="quiet intel_iommu=on iommu=pt"
-
If you have an AMD CPU, change this line to:
GRUB_CMDLINE_LINUX_DEFAULT="quiet amd_iommu=on iommu=pt"
-
Press
Ctrl+Xto exit,Yto save changes, thenEnterto confirm and exit back to the shell. -
Enter the command
update-gruband wait for the configuration changes to be applied to the grub bootloader. -
Enter the command
nano /etc/modulesinto the shell window to open the kernel modules list in the nano text editor. -
Go to the last line of this file and add these additional lines:
vfio
vfio_iommu_type1
vfio_pci
vfio_virqfd
-
Press
Ctrl+Xto exit,Yto save changes, thenEnterto confirm and exit back to the shell. -
Enter the command
update-initramfs -u -k allto update the kernel configuration.
Once complete, click the “Reboot” button in the controls in the top right corner to reboot your server again for these changes to take effect.
Next Steps
Congrats! Your Proxmox server is now set up and configured!
Next, we will set up a virtual machine on Proxmox that runs the TrueNAS operating system, which will host your main storage array for all your files.
If you don’t have multiple HDDs installed in addition to the SSD that we installed Proxmox on, you can skip the TrueNAS installation and proceed directly to setting up your Debian virtual machine for running your applications.
Last updated: January 2026